Pages

Sunday 25 September 2011

Sitting room hearth

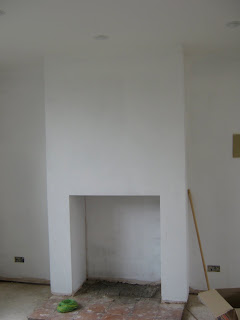
As there are now definite signs of Autmn I was relieved that we could get the hearth done for the new multi-fuel fire. The old hearth was made from quarry tiles which didn't work with the new scheme so they had to come out. They left a pattern in the cement like ammonites.
Quarry tiles gone

The height of the hearth had to be raised so that the flue out of the top of the stove could reach the chimney. Andrew decide to use self levelling compound but first had to make shuttering to hold the liquid in place.


Shuttering


Pouring the compound

After this had set Andrew could start tiling. We had decided on slates as the texture gives a nice contrast to the plain walls and the colours are right for the rest of the design. As usual he had help from Mortimer who is always eager to assist.


Eager helper


Because the hearth is small we decided on a brick bond layout which visually widens the area.

Laying out the tiles
Tricky cut


After grouting, using the same sand & cement mix that the tiles are laid in, and waiting a couple of days for everything to set we were able to get the stove installed. We had been recommended  Charnwood stoves by our local installer as they have an excellent reputation, are very heat efficient, look good and, as a bonus, the stoves are made in the U.K. It was manouevred it into place but we had to wait another day before lighting to let the fire cement dry. But finally we could lay a fire and set a match to it.

First flame


We then dragged two chairs in and sat with a  glass of wine, enjoying the warmth.  There is still a lot to do in this room - as you can see paintwork needs touching up and a skirting board wouldn't go amiss. But the flooring arrived this week and so we can see the end in sight for the sitting room.
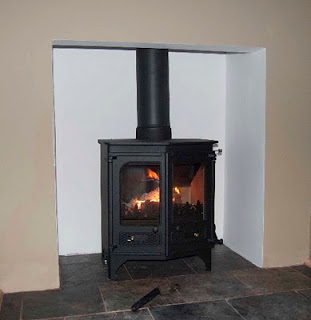
Finished

Until next time


Sharon

P.S the flash has altered the colour of the wall paint which has more green in it. For the nerdy among you it's Burnt Verdigris by Fired Earth :)


Sunday 18 September 2011

Guest room

Now we love to have guests and it's a pleasure to have a room that we can dedicate as a guest room and not use as a dumping ground. I like to make friends feel as though they're on holiday, even if it's just for a night. So I've been thinking about this room and thought I could have a bit of fun with it. Inspiration came from this photograph which we took while on holiday in Lake Garda earlier this year.
Lake Garda

I love the freshness of the pink and white but the grey grounds it and makes it feel more sophisticated.

My first thought was for the headboard, I wanted to do something a little funky and also give the room a bit of vintage character. I've collected fabrics forever and thought that I had a couple of metres of deep pink satin cotton which I could use, but whilst searching through the boxes found I'd used some of it already and there wasn't enough. But what I did find was some half pieced together patchworks and from there an idea grew.

Planning the patchwork

Pinned in place
I used to do a lot of patchwork and loved using old fabrics. Some of the sections were already pieced together and I recognised several Laura Ashley dresses that I wore in the 80's as well as a skirt or two of my mother's. It was quite difficult piecing the headboard together using existing stuff instead of starting from scratch but I hate waste and I'm also trying to have a clearout  so this project seemed the ideal opportunity to use them.

Finally, after two days, I was happy and started sewing everything together. I was lucky that Andrew had already made the headboard for our previous house so all I had to do was re-cover it.
Headboard in situ
Next time I'll show you the rest of the room.


Thursday 15 September 2011

Sitting room lights

No sooner than we get a nice smooth ceiling do we make Swiss cheese out of it. The lighting plan for the sitting room is simple but copious. The ceiling has 14 wall washes, 5 task lights and a pendant. Additional lighting will be standard and table lamps. The pendant is in place but 19 holes had to be made. The first job was to mark them, no mean feat as we had to decide what each group was to line up with.
Marking out the lights

Then Andrew got to play use his new toy gadget tool. Actually the variable hole cutter, with debris collector, is brilliant. Not only does it cut the holes perfectly but it also stops  the dust going in your eyes.
Cutting the holes
Once all the holes were drilled we could get the lights up and start to position the angle of the lamps for the wall washes. These won't be finalised until all the decoration is done and the furniture is in.
Fireplace end
Front of house
Mortimer helping with the lights
Lights in
As the room had been plaster skimmed we painted it with two coats of white emulsion to act as a sealer before the coloured coat. I can't believe how this transformed the space back into a room. The only annoyance is that it doesn't look like we've changed much as most of the work is hidden.

But the fireplace looks so much better. Remember this?

Next is to finish painting, cast a new hearth and tile it and put in new skirting boards. I've got to make the curtains (fabric arrived this afternoon), restore a cabinet and sort out flooring. But we're nearly there.


Until next time


Sharon

Saturday 10 September 2011

My talented friend

Carol & I met at the first year of secondary school, at the tender age of eleven. Although there have been times that we have lived different lives we have always kept in touch, more so as we have got older. When her two sons were little she knitted them each a 'blankie'. These were brightly coloured comforters, to be used in times of stress and illness, cocooning you on the sofa. Now I do have a bit of a thing about blankets and have a few in my collection but I truly envied the blankies.
Several years ago I received a single knitted diamond as a birthday present and Carol announced she was knitting me my own blankie. I was amazed, knowing how long they take to knit and considering that her life was already full with children, husband, a career and other serious commitments. A couple of 'it's nearly finished' deadlines came and went until a few weeks ago when she and her husband came to stay and she brought with her a big box. And inside was my very own blankie.

My blankie
Each diamond took an hour to knit and there are 150 of them, plus the sewing together and the lining. It's so gorgeous that I'm going to base the decorating scheme of the third bedroom around it.

Samuel the Spaniel looking on
Thank you Carol.


Wednesday 7 September 2011

Confessions of the weak willed

Now you may remember from here that, as the bedroom was a temporary decoration, I was going to keep the existing curtains for a while. But I didn't. I gave in. There was nothing wrong with them, they were  a vintage style in cotton, the colours went well with the new paint and they were already in situ but they were OK, just OK. The other issue was that that the room faces south east and so in the morning they let in a lot of light.

Wake up call

Existing curtains
So I decided to make some new ones as I am sure that the colour scheme will remain the same. After some internet trawling I found the perfect fabric at one of my favourite suppliers, Bell House Fabrics.
I used to be lucky enough to live near them and spent many a happy hour rummaging through their fabric rolls. Now they sell on the internet and I found a great Clarke & Clarke fabric which was perfect.
After cutting three curtains out (there are two windows) I discovered a fault in the fabric - a large hole.
Finger sized hole
I phoned them up and they were brilliant, not only offering to replace the fabric free of charge but also checking that the amount I had asked for included any pattern matching.
The interesting thing with the pattern was which way it went. The sample I received had no borders, and as it is a woven cotton no obvious way up. However when the fabric roll arrived the up arrow on the selvedge was not the way I expected and looked wrong, so I ignored it and technically made the curtains upside down.
I haven't made lined curtains for ages and forgot how much hand stitching there is but eventually (after four days) they were finished and I'm pretty pleased with the results. They certainly block a lot of early morning light and work well with the overall scheme. The photograph below gives quite a good indication of colour. The shot was taken straight after the photo of the original curtains so you can see the difference blackout lining makes.
No more light

In place
Meanwhile the sitting room continues and another temporary decoration - this time the guest room.

Until next time,


Sharon


Sunday 4 September 2011

Felbrigg Hall

Last weekend was my birthday and a bank holiday in the U.K so we took a couple of days off from house work and went exploring. Now we're living in a different area it's nice to visit National Trust properties that are new to us, and having looked at the map  we decided to go to Felbrigg Hall. Now I have to confess that, having been visiting stately homes for a few decades, the grand rooms and over elaborate decor can get a little much and it's the 'below stairs' rooms that I usually find more interesting. Felbrigg Hall however had a couple of surprises up it's sleeve. First was this ceiling.

Amazing craftmanship


Do you remember 'Iced Gem' biscuits? This looked liked giant ones upside down.  I'm always amazed at the skill of the workers in centuries past.
The next surprise was the dining room. I'm used to seeing rooms in rich reds and greens with dozens of portraits and so this confection of a room was a breath of fresh air - like being inside a wedding cake. The colour is  little grey here but it's actually lilac- grey, almost French in feel.

Dining room


The end of the tour was the staff area, I loved this corridor with all the buckets to douse the flames in case of a fire. It's almost Shaker in it's simplicity.

Servants corridor


Finally we saw the kitchen - I love cooking and would adore this dresser and the copper - as long as someone else did the polishing:) Notice the blue walls? Historically kitchens were painted blue to stop flies - apparently they were fooled into thinking that it was the sky and so didn't land.

Kitchen


Outside we ate ice cream whilst enjoying the kitchen garden. The herb garden was inspirational, one of the best I've seen.

Part of the herb garden


It started me plotting. We have a flower bed outside the sitting room window which is very dry and sunny - perfect for herbs. The previous owners had planted quite a lot in it but the hollyhocks have driven us mad. Not only do they grow in front of the window, they fall over the path,  I can see changes ahead.

Messy hollyhocks


I have to thank Andrew for the photographs - not only is he better than me, but he put up with me dirceting him to get the best shots. Well it was my birthday:)


We hope you enjoyed your brief visit to Felbrigg Hall,


Until next time.


Sharon


Thursday 1 September 2011

What a difference a day makes

Yesterday the plasterers came in to skim the sitting room.

7 a.m.

5 p.m.
Paintbrushes here we come.

Until next time.


Sharon